Version Control with Git in Y42
Version control is a set of processes to track and manage changes to information over time. It enables teams to work collaboratively and avoids an accidental overwriting of changes of the same code.
Today, by far the most popular version control system is Git. Git is an open source distributed version control system created by Linus Torvalds, also the creator of Linux.
The basics
To begin with, a git repository (”repo”) can be thought of as a folder, which may contain one or more files and other folders. This repo usually sits on a server (also called a remote) and can be downloaded (“checked out”) to their local machines by all project collaborators.
Git works mainly with what are called commits and branches. Any git repo will usually feature one main branch (usually aptly named “main”) that reflects the ground-truth state of all files in the repo. When a user wants to make changes to files in the repo, he or she will make those changes locally, then create a commit, and push that commit to the remote. In principle, any new commit can simply be pushed to the main branch.
Overview & tutorial
If you want to jump straight in, the video below gives an overview and a walkthrough of how to use git in Y42.
Keep reading below for more notes on how to use git in Y42, what to keep in mind, and what's happening under the hood.
A good default workflow
In our previous scenario above, if someone else in the team has made their own set of changes to the main branch in the time between our user pulled the repo and tried pushing their changes, merge conflicts may ensue!
Therefore, to effectively and sustainably manage complex changes by many collaborators over time, it is a good idea for everyone in the team to work in their own branch. This is effectively like taking a snapshot of all the files at one point in time and working on top of that copy.
In this approach, when a collaborator wants to make changes to some files, they will do so by making commits to their personal branch, then once they're done, they pull the latest changes from the main branch, and finally merge the complete set of changes back to the main branch when they are satisfied with the result.
The description above is in many ways an oversimplification of what happens in a state-of-the-art git workflow, and it is just one simple way to use git. However, for users just starting out, it is nevertheless is a reasonable way of getting to work quickly while avoiding typical versioning problems.
To recap:
- When making any change, start a new branch (e.g. under your own name, or using a name related to the change you are making)
- Perform all changes on this branch
- Pull the main branch into your own branch, resolve any issues that may result
- Commit and push back to the main branch
How git works under the hood in Y42
So far, we've been talking about files and folders, not really about models, integrations and all of the other core concepts present in Y42. However, as it turns out, these are almost exactly the same in practice!
Within Y42, whenever you work on an integration, a model, a dashboard or just about any other piece of configuration related to your data pipeline, you are in fact creating and editing various files in the underlying git repo of the space you are in. Under the hood, Y42 uses these config files as the blueprints and instructions to do things like creating jobs in the data warehouse, managing tables, sending alerts to users or performing various other actions.
Each space is effectively one git repository, and (nearly) all metadata and configuration is managed within this git repository, whether you are working with the Y42 app on the web, or directly on the config files using e.g. an IDE.
What's managed in git and what isn't
Of course, there are some exceptions to the rule that metadata and configs are stored in git:, sensitive data like integration credentials, user account information and a few other pieces of information like the in-app chat or access control data are stored in the Y42 backend, not git. When in doubt, you can simply check by inspecting the git repository and seeing for yourself what information is contained in the various files it manages.
To add some more detail: Y42's backend systems only knows about changes in git once they are committed & pushed to the remote repository - most edits that are made in the Y42 UI are first made locally, so for the changes to take effect, you generally need to explicitly commit the changes (note: the “commit” button in the UI will always perform both a commit and a push to the remote).
How to access your Gitlab repository
To access the Gitlab repo corresponding to a Y42 space, one has to do the following steps:
- In the space whose repo you want to open, open the file tree explorer by clicking its button on the top navigation bar
- On top of the file tree sidebar, click the button redirecting to the Gitlab repo
- In the new Gitlab tab, authenticate using your Y42 credentials
- And voilà, you have access to your Gitlab repo to be able to clone it and work with it locally or benefit from any of Gitlab's advanced version control features
How to work with your Gitlab repository locally
With Y42's Gitlab instance, cloning a repository to work with it locally is a two-step process:
- Generate an access token
- Use the access-token-based version of git clone
For generating an access token, please go to the 'Access Token' view in Gitlab. There, do make sure to activate the scopes read_repository and write_repository.
The access-token-based git clone reads as follows:
git clone https://<user_id>:<access_token>@gitlab.dev.y42.dev/y42-demo/dev-space-v2.git
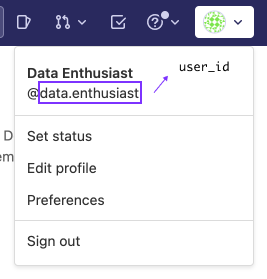
You can retrieve the user_id by clicking on the avatar on the right end of Gitlab's top navigation bar:
Updated over 3 years ago