Once you enter the UI Models, you are redirected to the Model Overview Menu, where all the created models are listed, as well as all the necessary information to immediately attest to what you are going to do next.
Once you enter a particular model, by default you are entering the Jobs tab. To create a new model or change an already existing one, jump to the Model Definition tab. Since you are in this section, you probably already have knowledge of how to create a new model. Let's now introduce this section by all its elements:
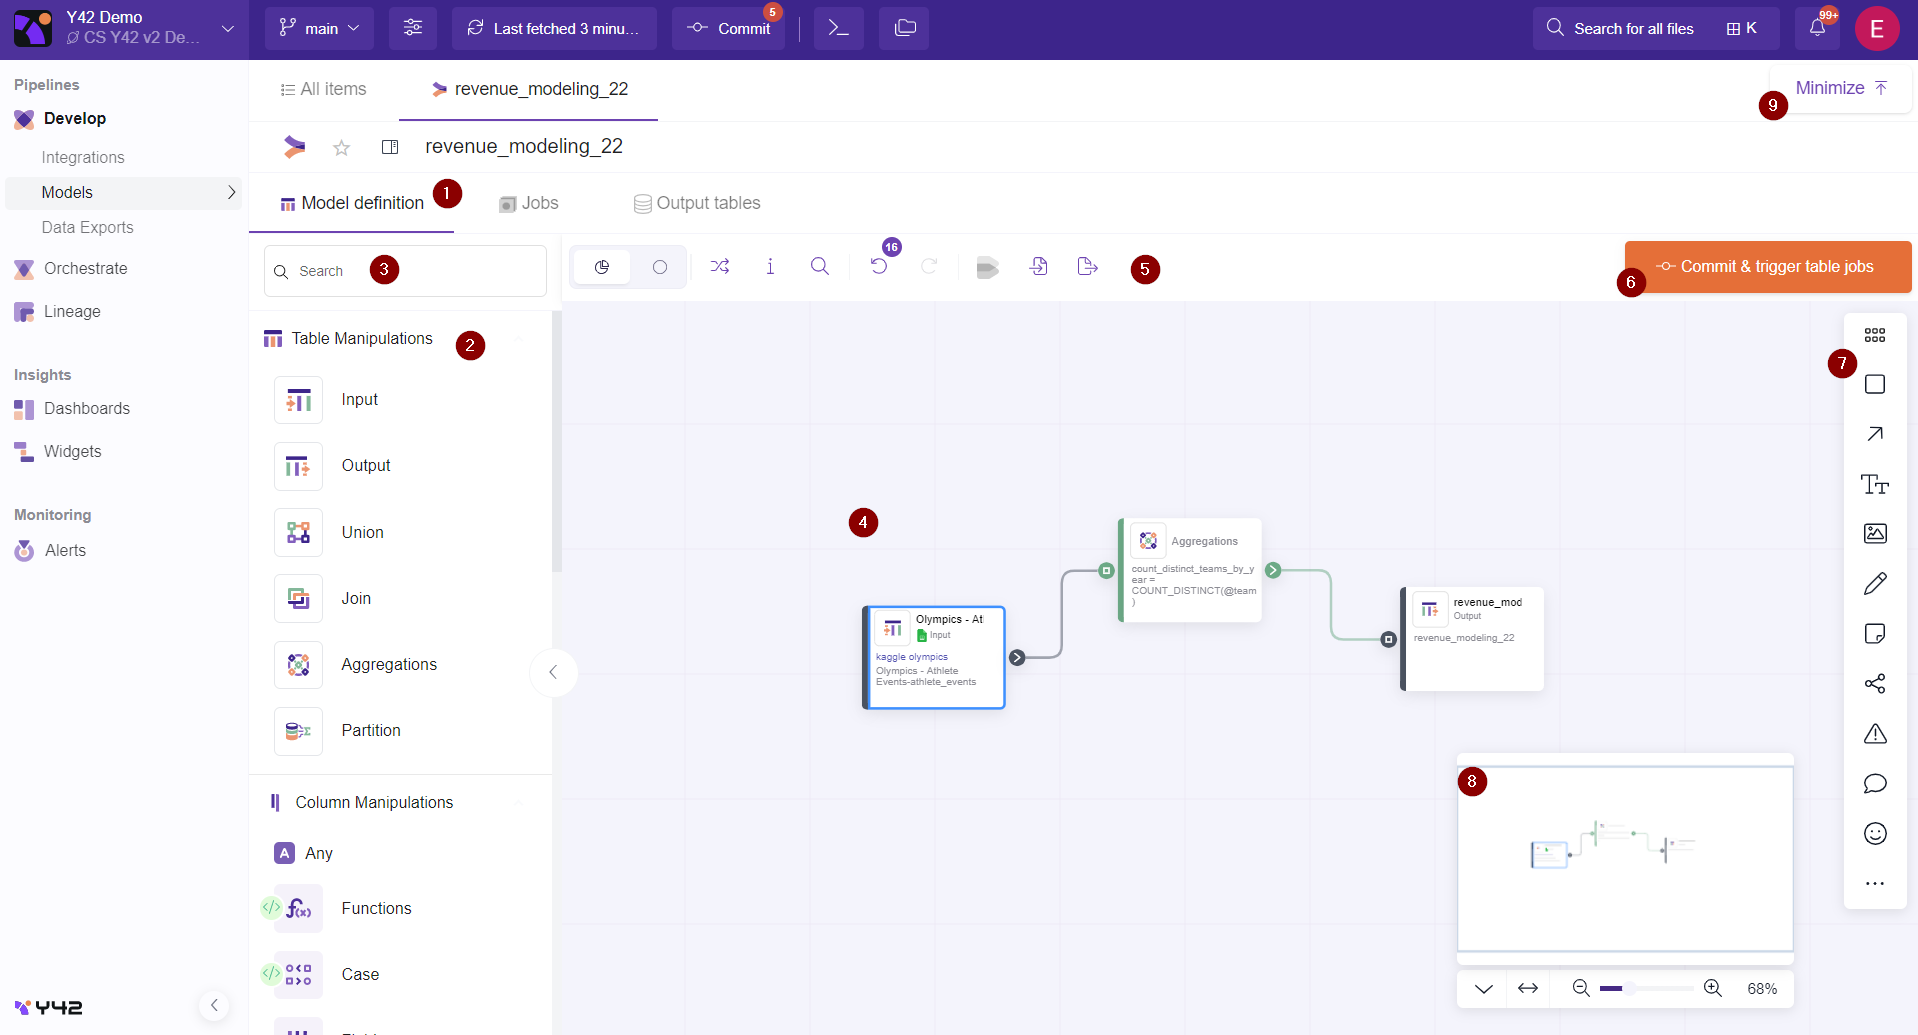
1 - Model Definition button. You need to click the structure button in order to start working on the model.
2 - Nodes. In this section all the Nodes appear. This is where the magic begins.
Each Node has its own functionality which you can learn in depth in our articles here.
What you need to keep in mind is that in order for the Model flow to work you need at least:
one Input Node (this is the node that connects your source of data (That you have already in the Integrations)
one Manipulation Node (every node that it is not Input and Output node)
one Output Node (this Node is required to store all your manipulations into a new distinct table, which will later appear into the Integrations section for further use)
The Nodes are grouped into these categories:
Table Manipulations
Input
Output
Union
Join
Aggregations
Partition
Column Manipulations
Functions
Case
Fields
Replace
JSON Extraction
Bin
Transpose
Coalesce
UniPivot
Pivot
Fill
Date Time
Date Comparison
Date Parser
Date Formatter
Date Manipulation
Geo
Geolocation
String
Text Extraction
Row Manipulation
Advanced Filter
Filter
Sort
Remove Duplicates
For a fast info on what each node does you might simply hover over the node and hover over the information sign that appears.

3 - Search. For a fast detection of the node you want to use simply start typing the name of the node type and it will appear on top of the search result.

4 - Working board. In this board you select and connect the Nodes together in order to manipulate the data.
In this article you find the detailed instructions on how to add and remove nodes and connections.

5- Board Panel. In this panel you might find useful tools like:

Minimize sidebar. When clicked hides the nodes section by making the working board bigger.

1000 Rows Preview Vs Full Preview switch. By default the model in order to save computing power displays in its previews 1000 rows. When switched to Full Preview it will display and calculate all the rows in the preview.
Note: Please take into consideration that Full Preview makes the nodes slower.

Align nodes. When clicked this button will automatically align the nodes in an orderly fashion.

Hot Keys. When click this button will display a popup window giving some keyboard shortcuts for actions making your interaction with the node smoother.

Search model. This button is useful when you have been working with a lot of nodes. It is used for searching for nodes that are already used into your board, making them easier to spot based on your searching criteria.

Undo and Redo. Y42 keeps record of everything you do on the board. Undo and Redo make sure that you can jump back and forth in your actions.

Import Existing Model. Like the name of the button suggests, this button gives the possibility to import an already saved model into the current one. All you need to do is click the button and select the model you want to import into the current one.

Import File Model and Download file model.
If you want to Download your version of the model into your local computer, you can do it by clicking the Download file model. It will be in JSON format.
If you want to import it later from your local computer, you can upload it via the button import File Model.

Lock/Unlock Model. This button is used to switch back and forth from View mode to Edit mode. When in view mode all the Board model will be disabled.

6- Commit. Once you made the changes you wanted to click commit in order to save your changes into the output data.
Note: After the data are committed the button will become non-clickable until new changes happen inside the board.

7- Collaboration Tools. This tools are used to make the collaboration as slick as possible for the team. Here you can add notes, group the nodes, insert shapes emojis, drawings etc. This article here goes in depth of the Collaboration tools capabilities.
8- Zoom in Zoom out Map. This map is useful to get an overview look of the board as well as zoom in and zoom out the working board.

9- Expand / Minimize Button.
This button helps in making the board higher by hiding the model sections panel. Once you finish with the working board you might need to show the panel again so you jump to the other sections of the model.
